Thursday, April 28, 2011

I'm naked!!!

Ok not really, but my nails are. I removed the last mani Tuesday, with the intention of doing a bright pink one with a glittery top coat. Well all went well until I added a layer of clear polish over top. The glittery layer and the clear layer reacted poorly.(As I've discovered they sometimes do. Seems not all polish formulas play nicely together!) The glittery layer actually shrank on my nails and looked like your fingers do after you soak in the bath or pool for too long! Not a good look. So I stripped it all off and added a fresh coat of base coat and called it a day. I planned on redoing it on Wednesday after grocery shopping. Unfortunately I managed to pull a muscle in my back out at the grocery store. Soooo For now my nails are au naturale. I must say though, they haven't looked this healthy in ages! They are a little thin though as over the last 3 weeks I've managed to split 3 different nails. So far I have saved them all using a super glue type nail glue and small pieces of single layer plain tissue. You simply brush the glue over the break and layer on a piece of tissue, let dry and repeat 1-3 more times. Let dry fully them file smooth. Maybe if I'm feeling better tomorrow I'll get a few coats of polish on my nails.


In the meantime, thankfully sitting at my desk isn't uncomfortable, so I have been working on the 1st of 2 loveseats for the dollhouse. I'm a little further alonger with it than these pics show, but not far enough to take more pics. Hopefully I should be able to do more tomorrow. These pieces are made from foam core, a this foam sheeting, fabric and wooden balls. I started with a basic pattern from Freida Gray's Dolls' House Furniture. This book is designed for 1/12th scale but many of the projects work really well for 1/6th scale. (with a few modifications for stability and play ability!) This 1st piece has gone together relatively easily and I figure the 2nd one should go together even faster! More pics to come tomorrow! =D

Monday, April 25, 2011

MOTW and Serendipity

I changed my polish Saturday night and decided to use a fun blue glitter nail polish I made. (Well I mixed the color anyway... lol) It seems within the polish 'scene', creating custom colors is called Franken-ing. (Like Frankenstein! heeheehee)
Sooo last week I found some nail polish that came in some clearanced make-up kits I bought a few years back. I really just wanted the cool cases! ;-) The bottles are tiny and I truly figured the paint would be old and gloppy. Surprisingly the consistency was still good. I picked a sheer beige color (I figure it was meant for doing French Manicures) and found some gorgeous teal holographic glitter in my craft stash. Little did I know that the polish would leach the color right off the glitter!!! So instead of a sheer polish with teal glitter, I ended up with a sheer teal polish with SILVER holographic glitter! I gotta say I love serendipity! To get the full coverage on most of my nails I needed 3 kinda heavy coats. The sparkle level is amazing, but the texture is a little rough. I've decided to call it Sunlight on the Water as it reminds me of the way sunlight sparkles on a smooth lake. On my ring finger of each hand I started off with a single coat of E by Essences' Forever Mine then topped that with a single coat of my franken. I think I actually like it better this way!


On the Barbie front, I sold several of my heart topped cupcakes this weekend! YAY!! (I did realize that I need to list the chocolate versions of these though!) I am working on the 1st loveseat, my husband is a great problem solver and an awesome out-of-the-box thinker and he helped me out with some stability issues. So this pair of seating should be awesome and perfectly capable of standing up to the imaginative play of a pair of 8yr old twins! =D(hopefully I'll have pics tomorrow)

Saturday, April 23, 2011

MOTW and Yay...PROGESS!!!!

Last nights' mani was loads of fun. I used 3 coats of Cover Girls' Aglow Pink as my base. (over a coats of clear base coat of course!) Then I used my ball stylus to add dots in 6 more shades of pink. For the most part I am happy with this look, although I can't ever seem to start my manis' before 8pm, which means they aren't fully dry by the time we got to bed. They looked good this morning, but after using acetone to get the last bit of residue off the furniture to be painted( a bit more on that in a sec...) The tips look atrocious. Soooo I'll be repainting my nails here in just a bit.
After spending a few hours out this morning with my hubby, we came home to an empty house. My sister had 'stolen' our kiddos to take them swimming at her place. (yep I did know they were being stolen. ;-D) Hubs and I chilled for a bit, before I got to work masking off the parts of the Barbie furniture I didn't want to have to repaint. Then I laid down a nice big tarp and some newspaper and set to work with several cans of Krylon Fusion paint in white, hammered aluminum and cast iron. The kitchen island started life being deep fuschia, the first vanity (there is a 2nd one coming soon) was hot pink, and the pair of 4-poster beds which were pale pink out of the box are all now crisp satin white! YAY!!!
After the paint has cured for a day I will start on the detail work. (although I think a trip to the craft store is needed to pick up some model paints) On the kitchen island I masked off the 'countertop' which is a pretty flecked pink color.
The vanity has a nice black top to it and I decided to leave it that way. I repainted all 4 of the night stand tops white, but and thinking about repainting 2 of them black to match the vanity top. I also repainted the refrigerator from deep pink to hammered aluminum. I had originally intended to paint the interior white but yeah, um...I decided that 8yr old little girls aren't going to care that the inside is silver! lol Last on my To-Be-Painted List was the dining room set. I had planned on leaving them white when I bought them, but once I realized that the seats sat way to low, I figured out a way to raise the seats. However doing this was going to leave things looking a little rough, so I used the 'cast iron black' Fusion paint to repaint the chair bases (the seat cushions are getting black sateen covers) and the table base. The also got left unpainted as it is grey with flecks in it so it looks like granite. (btw here is a link so you can see what some of the pieces originally looked like!)

Friday, April 22, 2011

A late MOTW


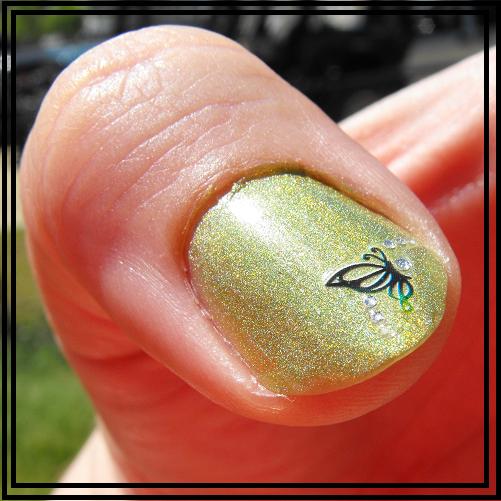
Eeeek I painted this mani back on Tuesday! I just got around to photographing it today! It's pretty but I'm ready for something new. I asked my friends on Facebook to pick my color for this one, and the first one suggested was orange. Since I was drooling over the Butterfly Wing mani from a few days back on Dee'z Nail blog... I felt orange was perfect! I started with my normal clear coat, then did 2 coats of Revlon's Siren. I must admit I was NOT happy with the way it covered. Maybe I didn't wait long enough between coats, but it smudged really badly. With most polishes by the time I finish all 10 fingers I can easily put on the second coat. Not so with Siren. Oh well. To try and even it out as well as add some shimmer I added one coat of OPI's Conga-line Coral. (if I decide to try the butterflies in orange again I think I'll just use 2 coats of this instead!) To add even more shine I added 1 coat of Nubar's 2010 which is a holographic flakie polish. On my ring finger of each hand I used Sally Hansen's Black Out and a fine brush. I now know why many nail salons use acrylic paints for artwork...this paint dried so quickly it was hard to get a clean smooth line. Next time I will definitely try using acrylics instead! The white dots were added using Petites French White, I dropped just a bit on some plastic and used a ball stylus in 3 different sizes and just dotted the polka dots. Dots are FUN, I will definitely be doing more of them!!! =D

On the doll front, my husband and I picked up the wood today for the 3 story Barbie doll house we are making. We decided to go with pine rather than plywood, partly because they had the exact size boards we needed, but also because the wood looked so much better. We decided that it was to pretty to paint, so with the 'customer's' ok, we chose a nice rich stain that will match the twins' bedroom furniture. I'm going to get down to business tonight on the furniture, and we will start construction next week!

Sunday, April 17, 2011

MOTW


This week I promise I'll be back to crafting. Yesterday we had a BBQ to celebrate the return of my husband and his unit from Iraq. (2 weeks ago) While we did have some nasty weather Friday night, Saturday was lovely. We had a great turn out of friends and family, loads of great food and tons of fun!

After we got home from the BBQ my mani started to peel. This is the second one to do this. Not sure if it's the base coat I am using or what, but the polish peeled off like the BOPO (Brush On Peel Off) polish I remember having as a little girl! So I removed all of the last mani and started fresh with something bright and Spring-like. I used 3 coats of China Glaze's Laser Lime from their Tronica line. I bought mine at Sally Beauty Supply's brick & mortar store. I checked their online shop, but didn't see it there.(which BTW Sally's has a buy 2 get 1 free sale on polish right now!!!) I topped it off with two coats of top coat. On my thumbs I did one coat of top coat, let that dry and them added a butterfly nail art sticker made by Kiss. (these are readily available at Wal-Mart, Kmart or other stores) After pressing the sticker down I brushed a second coat of top coat over the sticker to seal it in.

Starting tomorrow I will be getting down to serious business on the Barbie house. So be prepared for lots of crafty stuff! =D

Thursday, April 14, 2011

MOTW


My youngest son picked out todays' mani. I have several nail polish sample wheels done up with all my polishes and I asked him to choose. One of the wheels is nothing but my pale and glitter polishes sampled over black. This was his choice. Sally Hansen Black Out (2 coats) topped with Northern Lights Hologram top coat. I bought mine at Sally Beauty Supply. I did use 5 coats of this as I wanted the holo effect to be rather strong. BUT this does look fantastic with just 2 coats! (I'm tempted to do a couple more coats just for grins and giggles just to see how holo I can go! =D)

Still no minis or Barbie work as we've been doing stuff here at home. I'm throwing my hubby a 'Welcome Home' BBQ on Saturday, but hopefully Monday I will be ready to dig into my crafty pursuits. In the meantime thanks for being patient and enjoying my manicure fun. Have a great weekend y'all!!!

Monday, April 11, 2011

whee!

Ok, this is completely random, but YAY! I can blog from my phone! Lol!

MOTW 2.0


I decided to play a little today with the rich teal mani from yesterday...I took a kitchen type sponge cut a small piece and then tore and edge to rough it up a bit. Then I took a pretty silver polish called Athena by Stila dropped a bit on some waxed paper. I used the sponge (which I dampened and wrung our really good) to dab the silver onto the tips of the nails and then up about a third of the way up the nail too. I am really happy with the way it looks now. I think this color is a bit dark for a fun spring mani, BUT I am loving the technique and will do it again for SURE! =D

Sunday, April 10, 2011

MOTW and new phones


So today was a gorgeous day and we had intended to take the kids out bike riding. Instead we found ourselves drawn into a River Monsters marathon on Animal Planet. None of us fish (heck I don't even eat fish!) but this is an awesome show! So after watching about 3 hour long episodes we decided it was too hot to hit the park. (it had hit 90 degrees by noon!!!) The hubs and I decided to venture out to Verizon to trade in our old phones and switch over from T-Mobile. (With T-M, we barely got signal in our HOUSE!!!) My hubby got a Brigade which is a heavy duty phone. And with MY husband that's a good thing! LOL Me, well I went in intending to just get a simple phone. I mean I really don't use it for much other than making calls and texting...well needless to say I walked out with Droid 2!!!! Now I can take my 'computer' with me anywhere I go! I love the QWERTY keyboard and love that I can facebook and twitter from my phone. hmm I might even be able to blog from it!

After getting our new phones the hubs and I went used car shopping. While he was deployed we dropped down to just a single vehicle but now that he is home he needs one so that I can have transport to do things during the day while he's at work. We didn't find anything that we both liked that fit all our criteria. So we'll save that for another day. (although we do have a lead on a dealership a few hours from here that has some NICE looking cars on his lot)

After a dinner of slow cooked pork roast, brown rice and fruit, I removed the pink holographic polish from the other day. I had hubby look through my polish sample wheels and asked him to choose. (He's got a great eye for color!) He narrowed it down to 4 that he liked, 2 greens and 2 teals. He liked the teals just a bit more so I decided to go that route. Since my Sees-ter is wearing one of the 2 colors he picked on her toes I decided to go with the other one.

This polish is from a cute little set I found at TJ Maxx. It was 8 full size bottles of Goldie brand nail polish. My sister said this was a brand that Bath & Body Works used to sell and my research online confirms this. However B&BW no longer sells it and so far the only place I've been able to find it is online for RIDICULOUS prices! I think I paid about $8 for the SET in the store, but online they are selling it for around $30!!!! That to me is insane! My color today is a rich dark teal with a heavy metallic shimmer. While the shine is gorgeous without a top coat the amount of shimmer in it really requires one to have a smooth finish. honestly 2 coats of top coat would be better. The polish goes on really smoothly and 2 coats left me with a fantastic rich coverage!

Friday, April 8, 2011

A little something new...


I recently got back into doing my nails on a regular basis. No long acrylics, just a nice comfy length that still allows me to work with clay. I went on a bit of a polish buying spree a few weeks ago and wound up with about 90 polishes!!! So I'm going to start doing my nails atleast twice a week. (that way I can justify them! LOL) Some days it'll just be a simple paint job, but I also want to try doing some nail art too. So I'm going to try to add a Mani Of The Week (MOTW) feature to my blog!

This weeks mani is an awesome holographic polish from Sally Hansen in their Nail Prisms line called Pink Rose Diamond. (these are available on ebay) It's a pale rose color with an amazing color changing holographic quality. It goes on super smooth and covers well. It also looks awesome as a single coat over a dark polish too!

Sunday, April 3, 2011

HE'S HOME!!!!!


After nearly a year my husband is home from Iraq!!!! He arrived in yesterday evening and we are enjoying just kicking back and savoring having our family all together again!

I am sorry I haven't posted anything in ages. Shortly after my last post (in January!!!!) I hurt one of my feet, so since I normally sit cross-legged at my desk (which ironically is I think how I hurt it in the first place) I brought my laptop into the living room. So I haven't created anything lately. Then once my foot was healed I started getting into my 'holy-cow-my-husbands'-almost-home' mode. Well now that he finally is I will be getting back to creating soon, as I am rather behind on my 1/6th scale dollhouse commission!

So be on the look out for more posts and new creations soon!